Every great product has a solid Ideation process at its core. Here’s an overview of how we captured our findings for Vodafone, and a guide on how to set up for user testing sessions yourself.
It begins with knowing that each project and product requires a different approach, and having the experience and flexibility to handle that is key.
At Despark, we make Ideation one of our key offerings to clients. We begin by bringing our senior team into the fold to embark on the discovery process, where we ask “why?” and “how?” a lot and begin to refine and extrapolate their idea. Next, we examine the possible solutions to realise the initial idea and get to work on thoroughly researching the different approaches and technologies available. Finally, we create the working prototype and put it in the hands of users to get their crucial feedback that helps us to really finesse our offering. To achieve all of this we use the Google Design Sprint methodology.
It’s that final stage that we’re going to look at in this post, taking you through an example of an Ideation process we carried out for Vodafone.
Case study: Vodafone
Vodafone enlisted us to create a prototype product to help them reconnect with their customers and improve customer experience to support the UK brand strategy, improve efficiency and reduce costs.
Getting feedback from potential target profile users is obviously incredibly valuable, and when it comes to assessing the direct user experience of a prototype, it’s usually best to carry the process out and observe it in a 1:1 interview situation.
Here’s an overview of how we captured our findings for Vodafone, and a guide on how to set up for user testing sessions.
Setup
For user testing interviews, you’ll need to:
- Record user reactions to using the prototype
- Capture good audio so you can extract quotes and insights afterwards
- Stream to a remote location for the client to watch in real-time
It’s actually quite tricky to find an all-in-one solution to cover these requirements, so we used the following setup:
Software:
- Open Broadcast Software (free audio-visual streaming program)
- QuickTime
Hardware:
- MacBook Air (Mid 2013)
- External web camera
- External microphone
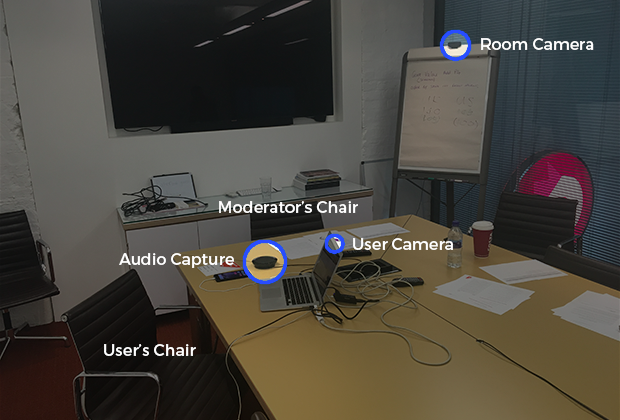
Our room setup
Connecting the hardware
Firstly, we connected all our external peripherals to the MacBook Air.
We started by connecting the iPhone — which is where the users tested the product prototype itself — to the laptop via a cable so that we could stream what was happening on the screen as the user interacted with the prototype in real-time. We tried using third party software to AirPlay the device screen to the Mac, but the connection wasn’t reliable enough.
Having the iPhone connected via a cable also helped to justify why there was a laptop so close to the participants (which were also using to record their faces and to capture their reactions). We didn’t want them to feel intimidated by constantly thinking about the fact that they were being filmed, and this helped to quell that feeling.
Next, we connected the external camera to the Mac to capture the users’ body language and gestures. Although this doesn’t offer a huge amount of additional insight, sometimes actions speak louder than words and it all helps to build up a clearer picture of their feelings about the product. We tried to put the camera where it wouldn’t be noticed by participants so that they didn’t feel nervous about it, but they were aware they were being recorded and had already signed a disclaimer allowing permission for us to do so.
Finally we connected the external mic. We could have used the laptop’s internal microphone, but we wanted optimal audio quality. Furthermore, because of how people were positioned it would have been hard to capture both the user and the facilitator’s voices using the built-in microphone.
Setting up the software
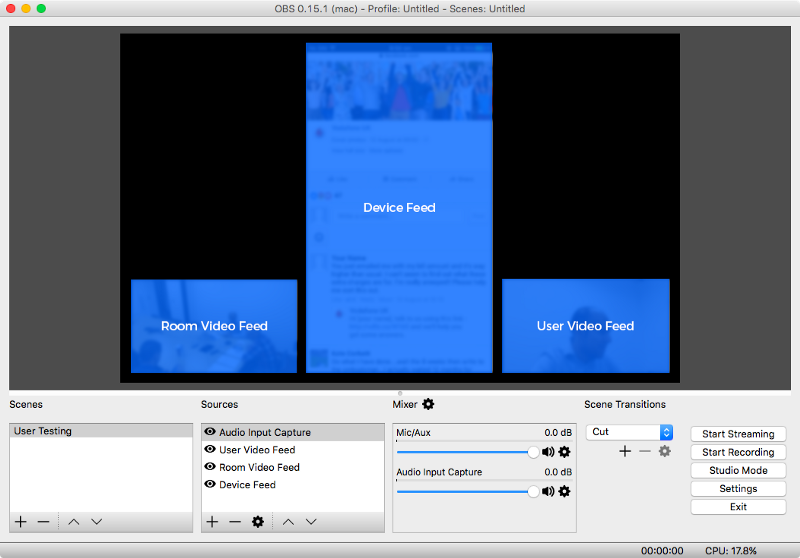
We chose Open Broadcast Software as our streaming hub. It’s free and comes with plenty of options and the ability to mix multiple video and audio inputs and to cut between them in real-time.
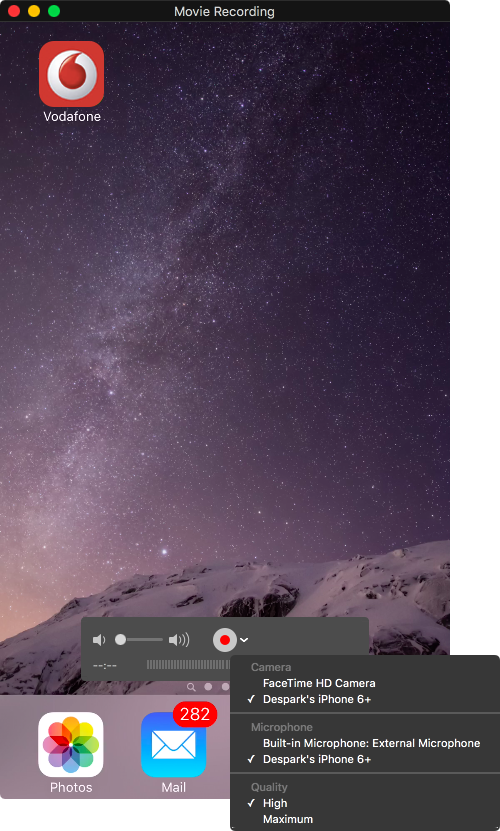
We used QuickTime to allow us to see and capture what was happening on the iPhone that the user was testing the prototype on. We used the ‘New Movie Recording’ option in the ‘File’ menu and chose the iPhone from the drop-down button as shown below.
Then we had to configure our live scene in OBS to capture all the required inputs. Here’s how we set up:
- Two Video Capture Devices: one for the external camera and one for the FaceTime camera on the laptop.
- One Display Capture: where we cropped only the QuickTime window from our visible desktop view. Although there’s a dedicated Window Capture source in OBS, it’s slower and you can see a noticeable lag when recording through it, so it’s best avoided.
- One Audio Input Capture: you still need to make sure that you have selected the correct sound input device (the external mic) in your System Preferences → Audio section on your Mac or this won’t work.
We tested the recording and it all looked flawless. It’s important to pick a good video format in OBS’ Preferences as the default one is .flv which isn’t great. We chose to go with .mkv.
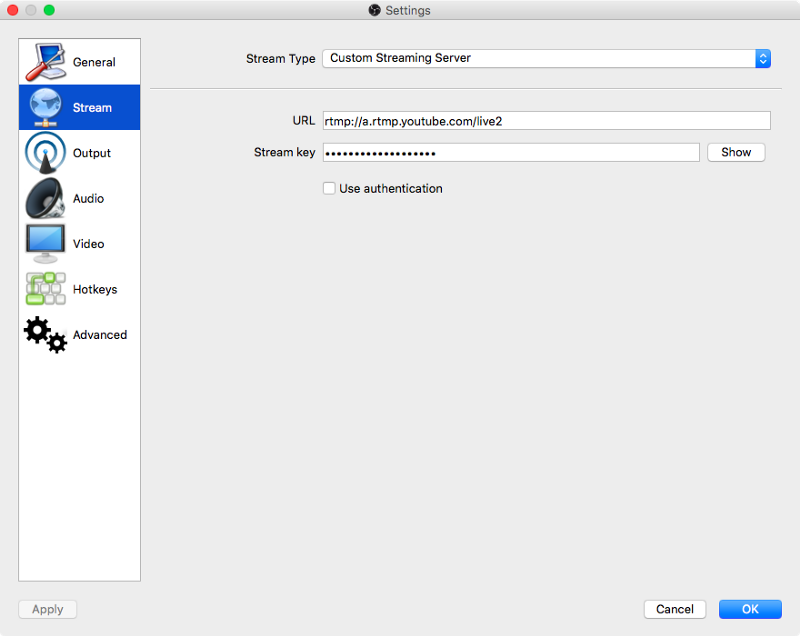
Next, we had to set up the live stream. We decided to use YouTube and stream the session via a private Live Event link. You can click here to find out how to stream live on YouTube (make sure you create an event or you won’t be able to create an unlisted stream), but you don’t need to worry too much about the options. Simply choose a stream name and a starting time for your stream and selected the ‘unlisted’ option to keep your event private.
Once you’ve created your event on YouTube, you need to choose the bitrate (quality) of your stream via the Basic Integration dropdown menu. Finally, you need to copy the Primary Server URL and Stream Name and paste them into the required fields in OBS.
Now it’s time to test your stream and then go live if everything’s working OK. All you have to do is click “Start Streaming” on OBS and go through the “Preview Stream” and “Start Streaming” on YouTube too. It will then pull through your live feed from OBS. Then you should be good to go!
We spent the whole day in our observation room testing different users and we didn’t have any problems with this setup. Both recording and streaming worked perfectly and we couldn’t be happier with the user insights we were able to catch.
All our insight came from this simple and cost-effective setup. It’s so easy to create a setup like this these days that anyone testing out a product really should be embracing it. It’s an essential part of the Ideation process, for products and brands both big and small.
The feedback on the product was great, especially when compared to Vodafone’s existing site. We look forward to the product launching and look to longer term introduce a vision to revolutionise the way brands communicate with their customers across their entire business.